Oraflow Your Intelligent Sales Planner
oraflow, Oppora.ai oraflow, oraflow tutorial, how to use Oppora oraflow, Ai planner, Oraflow sales planner, AI sales workflow automation, intelligent sales planner, Oraflow Assistant, AI sales planner tool, how to automate outreach campaigns.
Turn a single goal into a complete automated sales workflow.
What Oraflow Is
Oraflow helps you build a complete sales plan using AI. You describe your goal, and Oraflow creates the entire workflow from company discovery to lead extraction, enrichment, email validation, campaign creation, ReplyOra activation, and CRM updates.
You don’t need spreadsheets or manual research. Oraflow handles the planning and execution for you. The system also gives you checkpoints, so you stay in control without doing the hard work yourself.
Once the plan is ready, you can launch your outreach and let ReplyOra manage responses automatically.
Benefits
- Build a complete plan from simple instructions
- Save hours of research and list-building
- Stay in control with review checkpoints
- Launch campaigns faster
- Automate replies and CRM updates
Feature Sub-Parts
- Oraflow Assistant – Where you describe your goal to the AI.
- Automation Agents – Company finder, lead finder, enrichment, scoring, validation, and more.
- Manual Checkpoints – You approve critical steps.
- Plan Execution Dashboard – View progress and logs.
- Campaign Generator – Creates a full outreach sequence for you.
Prerequisites
- You must be logged into your Oppora account.
- Your email account should be connected for sending campaigns.
- Enrichment and email discovery require plan credits.
- CRM sync requires CRM integration to be enabled.
How to Use Oraflow’s Ora Assistant and Planner Step-by-Step Assistant
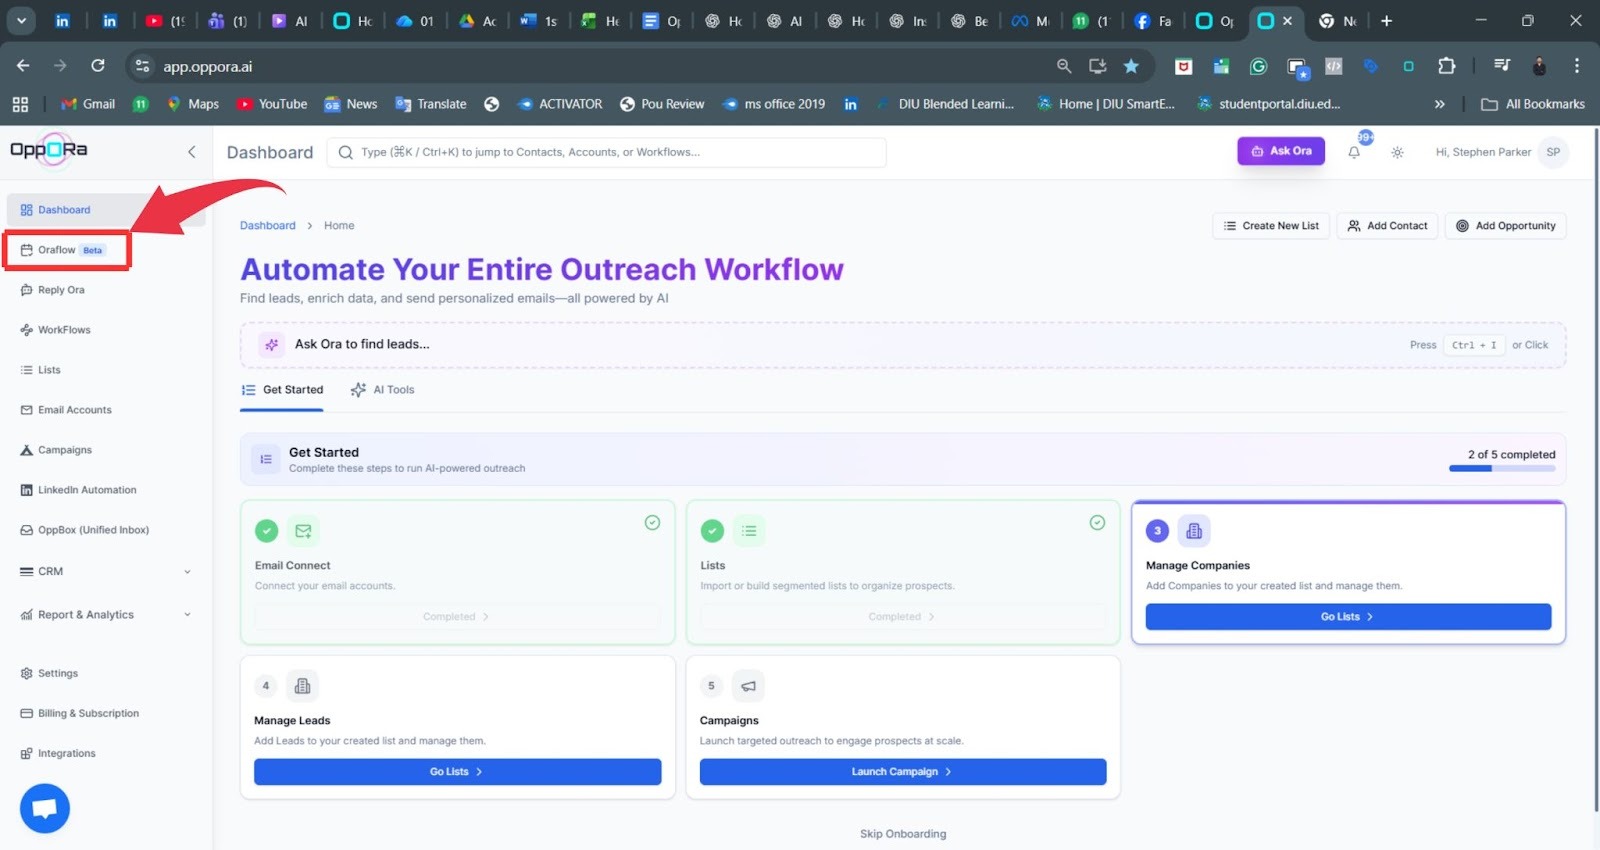
Step 1: Open Oraflow
Go to the Oraflow section from your sidebar. This is where each automation journey begins. You can start new plans or manage existing ones.
This dashboard gives you access to your planning tools and AI assistance. There’s nothing to configure here — simply open the section and continue.
Think of this as the home screen for your sales planning. Once you’re inside, you’re ready to begin creating your workflow with just a few clicks.
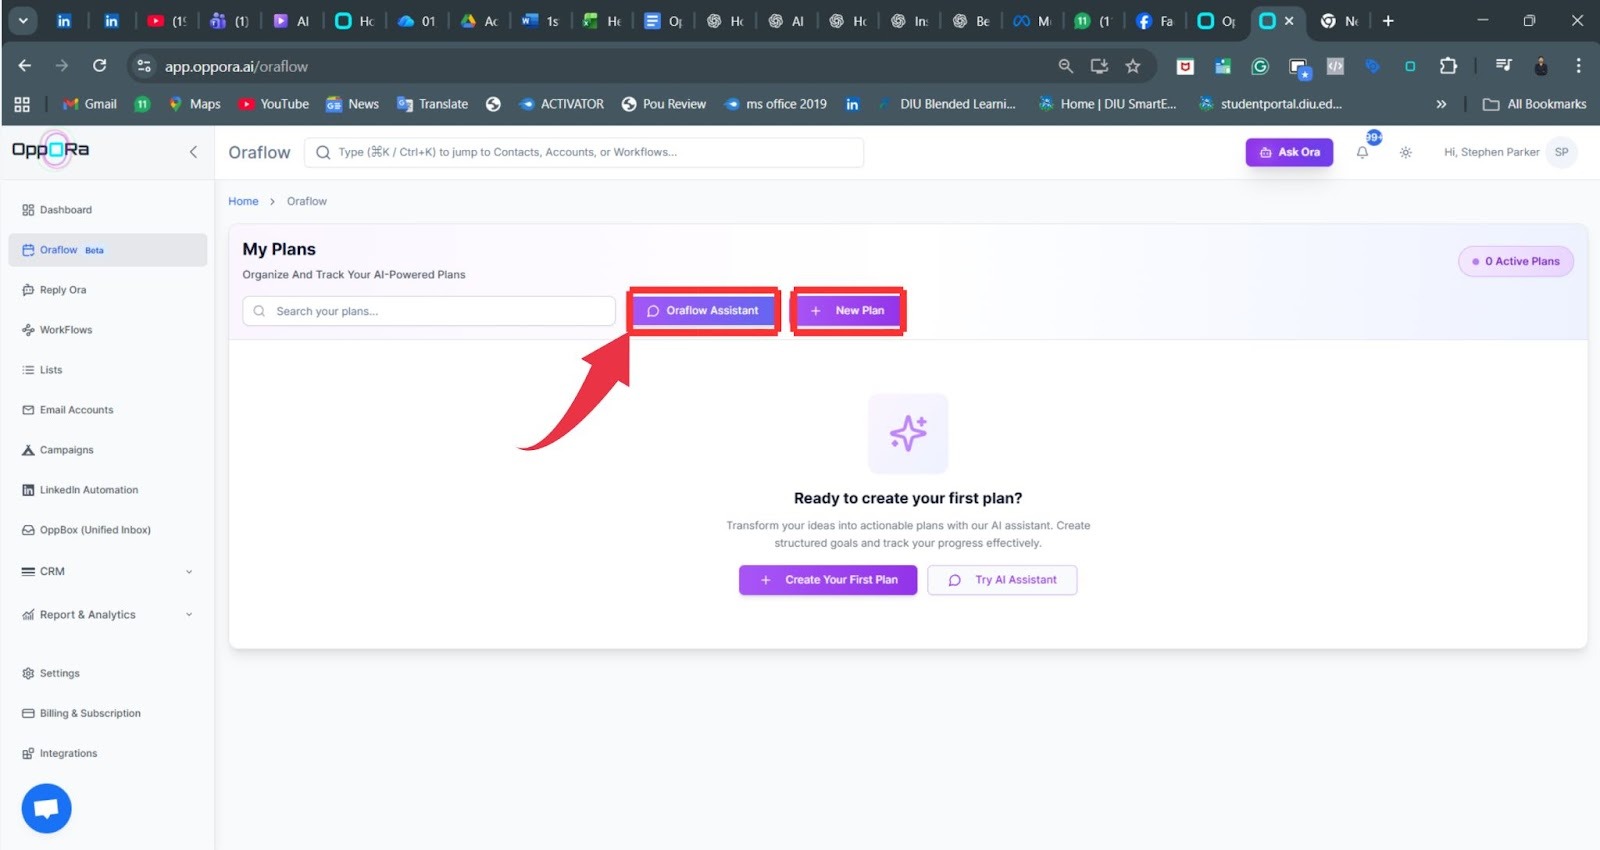
Step 2: Open Oraflow Assistant
Click Oraflow Assistant to begin planning. This AI chat window is where you describe what you want. You don’t need to write complex prompts simple instructions work best.
The assistant converts your words into a structured plan. This step is where your entire process starts. You ask, and Oraflow builds.
Step 3: Write Your Goal
Type your main goal in one clear sentence. Try to include who you want to target and why. For example: “I want to reach 100 CEOs in San Francisco to promote my SaaS product.”
Oraflow uses this information to design your workflow. The clearer your goal, the better Oraflow will execute it. Once you submit your goal, the assistant starts analyzing and preparing the next questions needed to refine your plan.

Step 4: Select Your Business Type
Oraflow will now ask what kind of business you run. You’ll choose from options like SaaS, Services, or Product-based.
This choice helps Oraflow customize the plan for your industry. Each type has different targeting styles, lead roles, and outreach messages. Selecting the right category ensures that Oraflow builds a workflow that feels relevant and aligned with your offer.

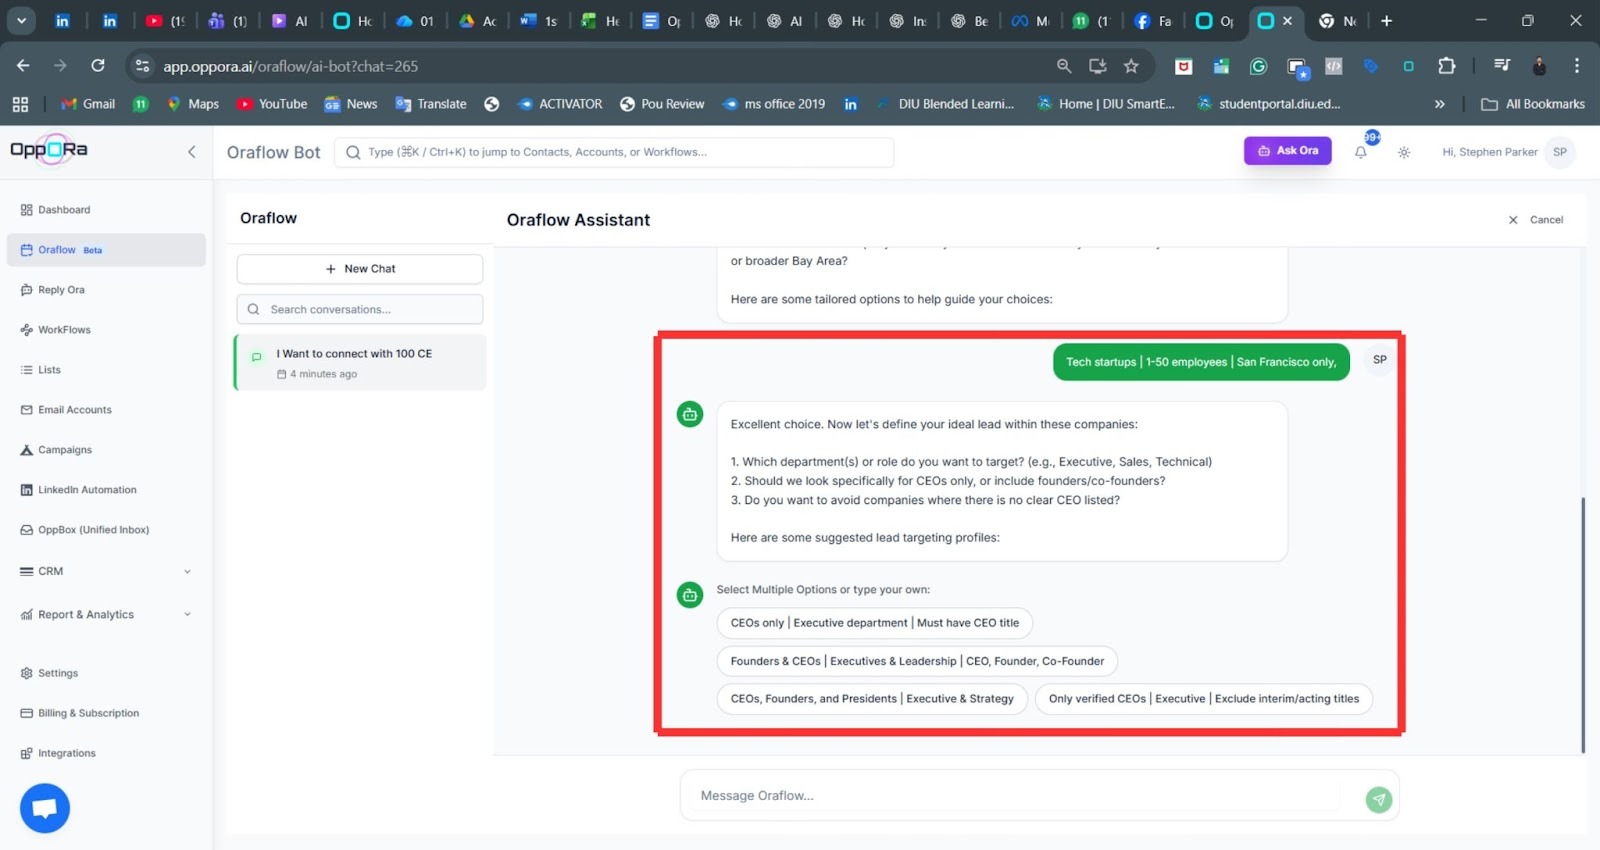
Step 5: Choose Your Target Roles
Next, Oraflow suggests target roles that might fit your goal. You can choose CEOs, Founders, Executives, or any combination.
This step defines the people Oraflow will extract later. If your audience is specific, choose roles that reflect your ICP (Ideal Customer Profile). If your audience is broad, select multiple roles. These choices help Oraflow capture the right decision-makers for your workflow.
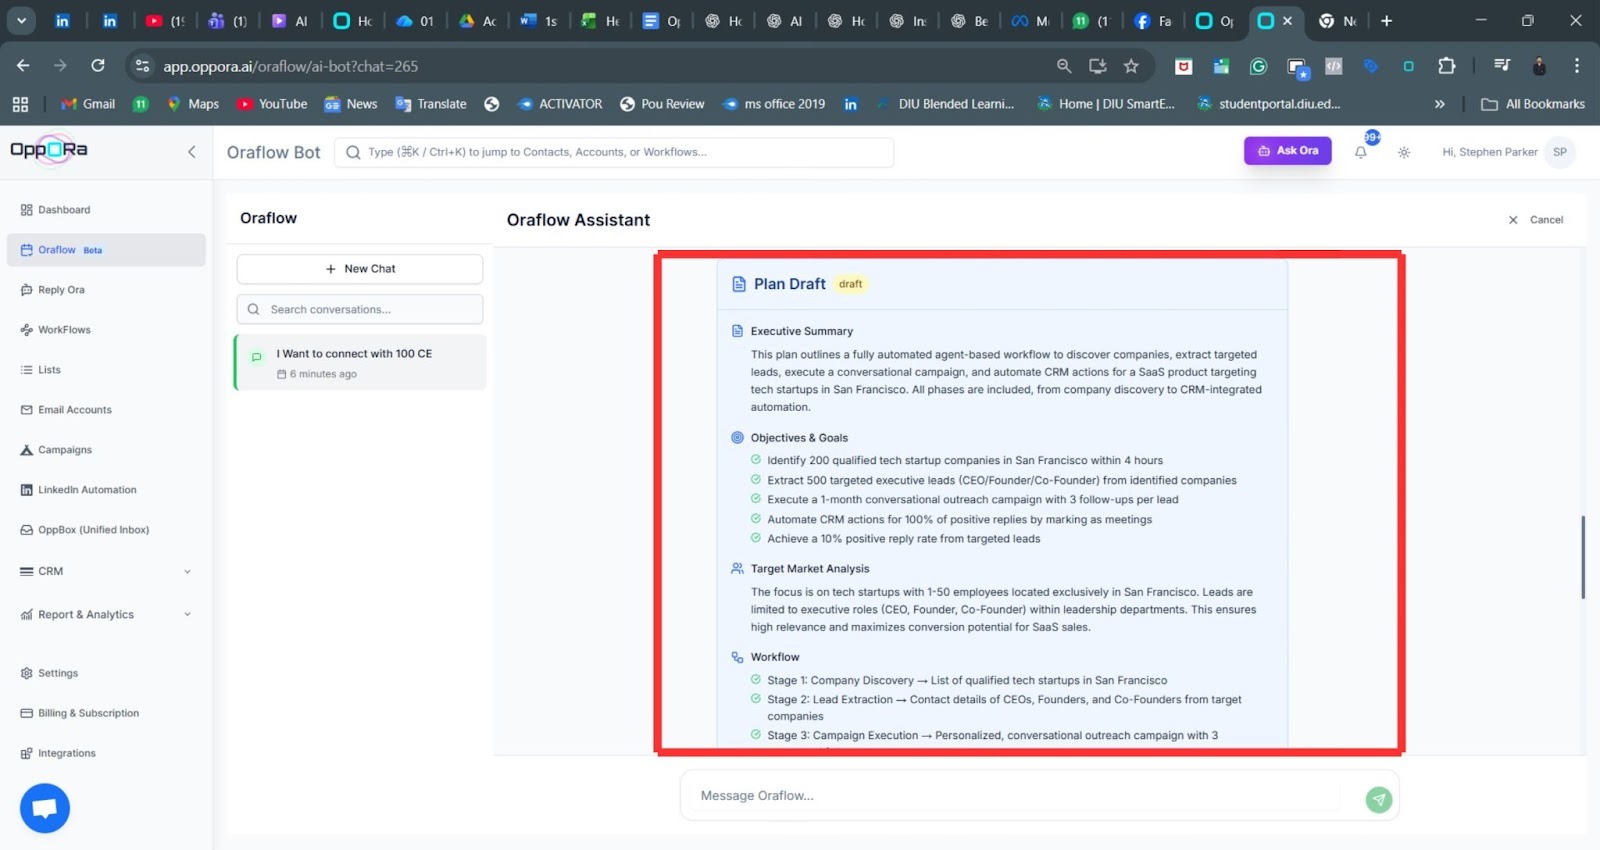
Step 6: Review the Draft Plan
Oraflow now creates a draft plan summarizing your workflow. You’ll see a goal summary, targeting outline, and the steps Oraflow plans to run.
Think of this as a preview of the automation. It helps you confirm that Oraflow understood your goal correctly. You can read it quickly and decide if any part needs refinement before moving forward.
Step 7: Approve or Edit the Plan
You can either approve the plan as-is or make updates. Editing allows you to adjust the audience, timeline, or other details without starting over.
Approving moves you to the automation setup. This step ensures the plan reflects your intent before Oraflow begins building the sequence.

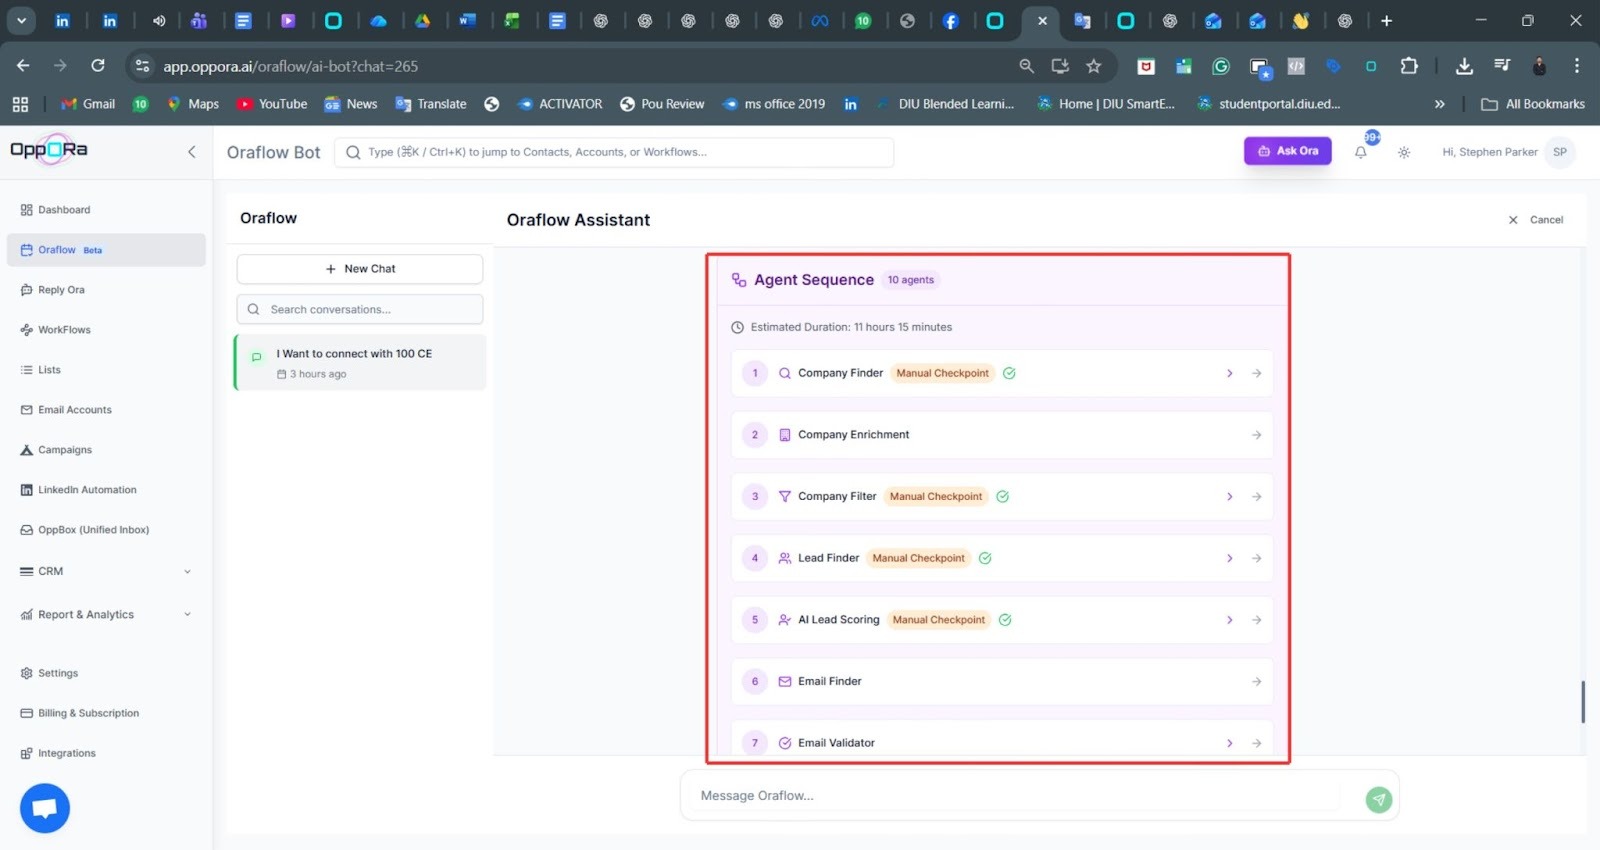
Step 8: View the Agent Sequence
Oraflow now displays the full list of automation agents. You’ll see steps like company finder, enrichment, filtering, lead finder, scoring, email discovery, validation, campaign generation, and CRM updates.
This sequence shows the exact path Oraflow will take to complete your plan.
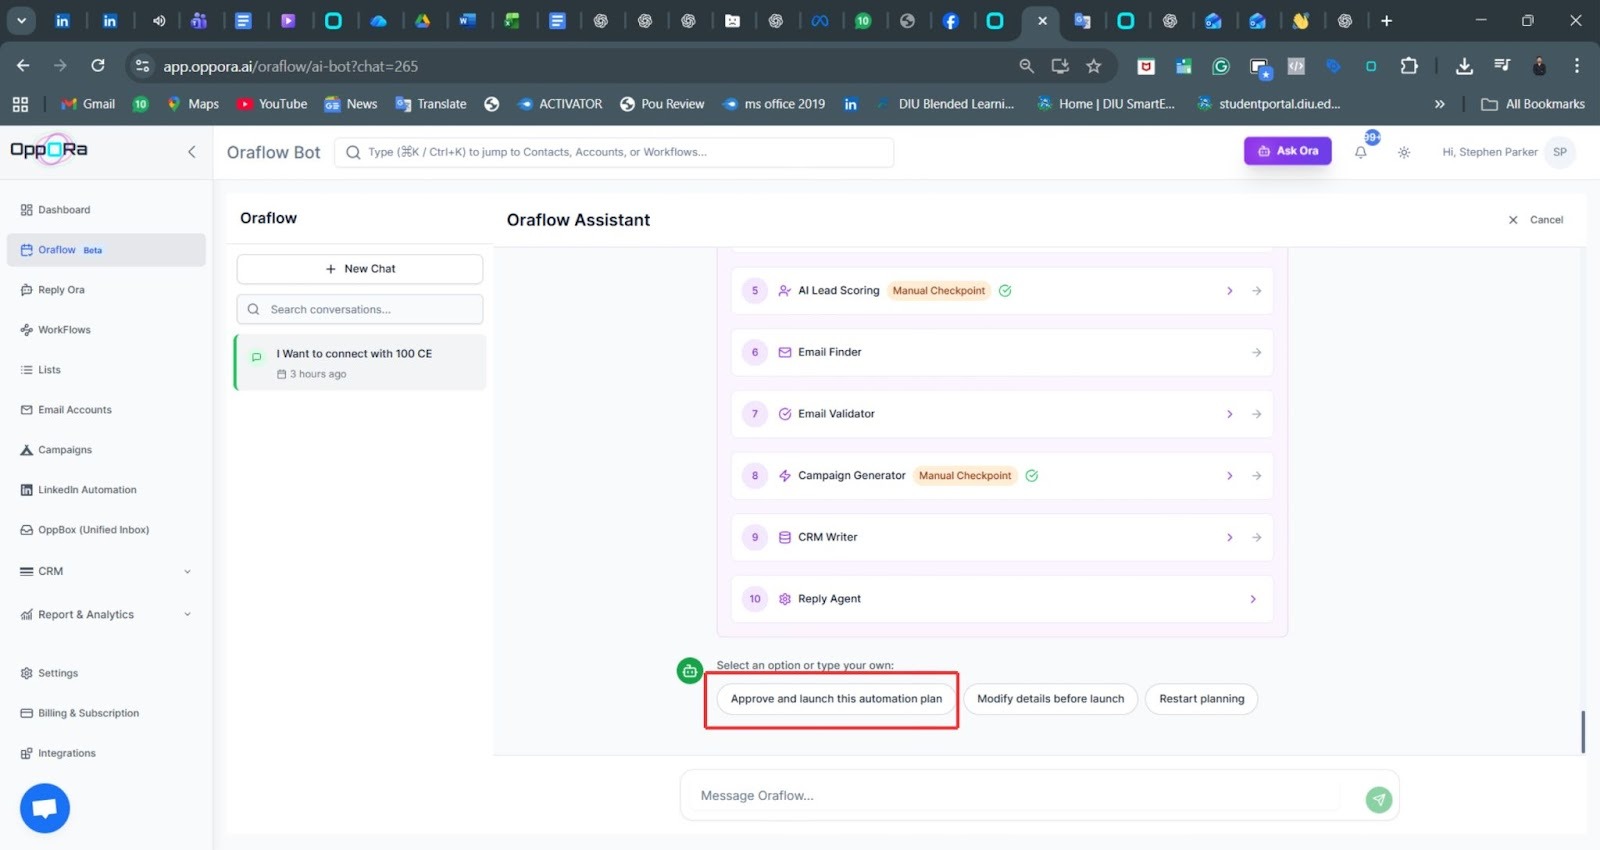
Step 9: Approve the Automation Sequence
After reviewing the sequence, click Approve. This action locks the structure and prepares Oraflow to execute it. Approving ensures the agents run in the correct order and follow your plan without accidental changes.
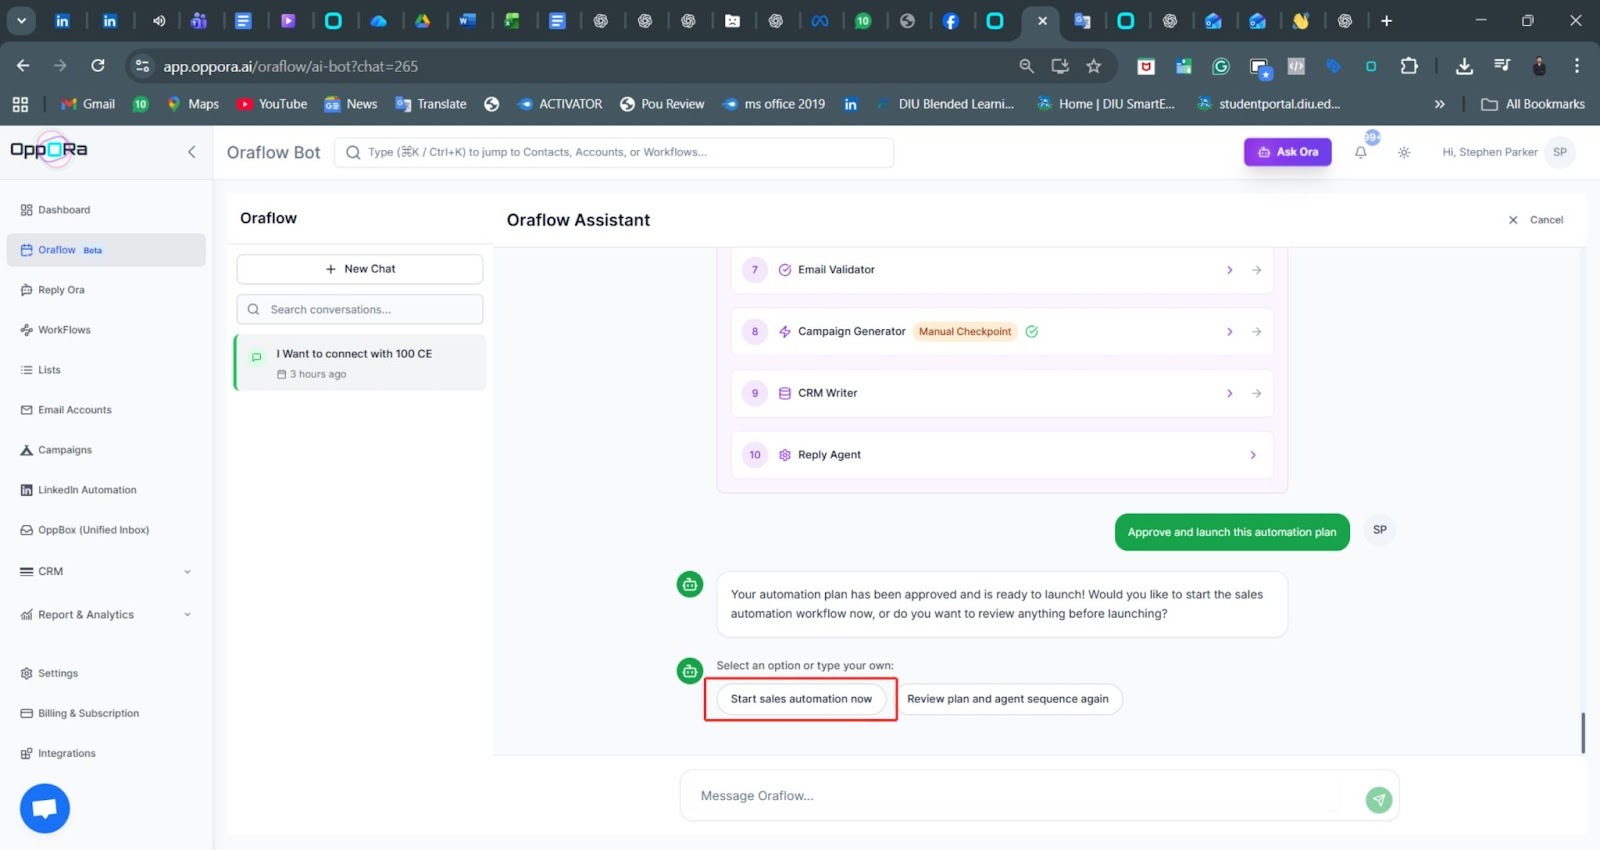
Step 10: Start Sales Automation
Click Start Sales Automation Now. This activates the workflow. Oraflow begins running each agent automatically. You don't need to intervene unless a checkpoint appears. This step moves your plan from planning to execution.
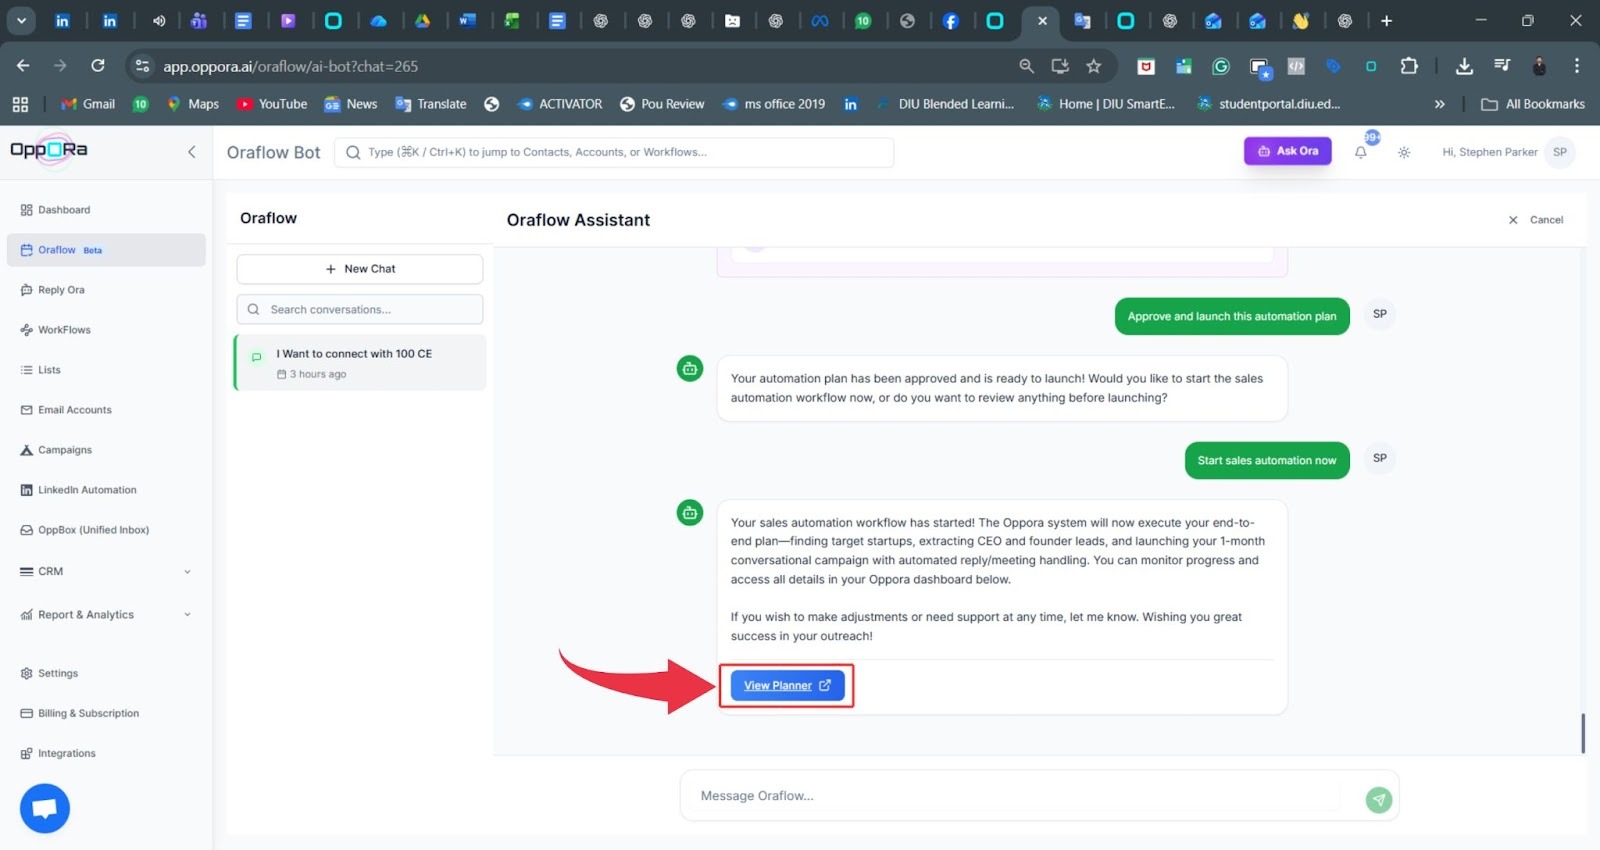
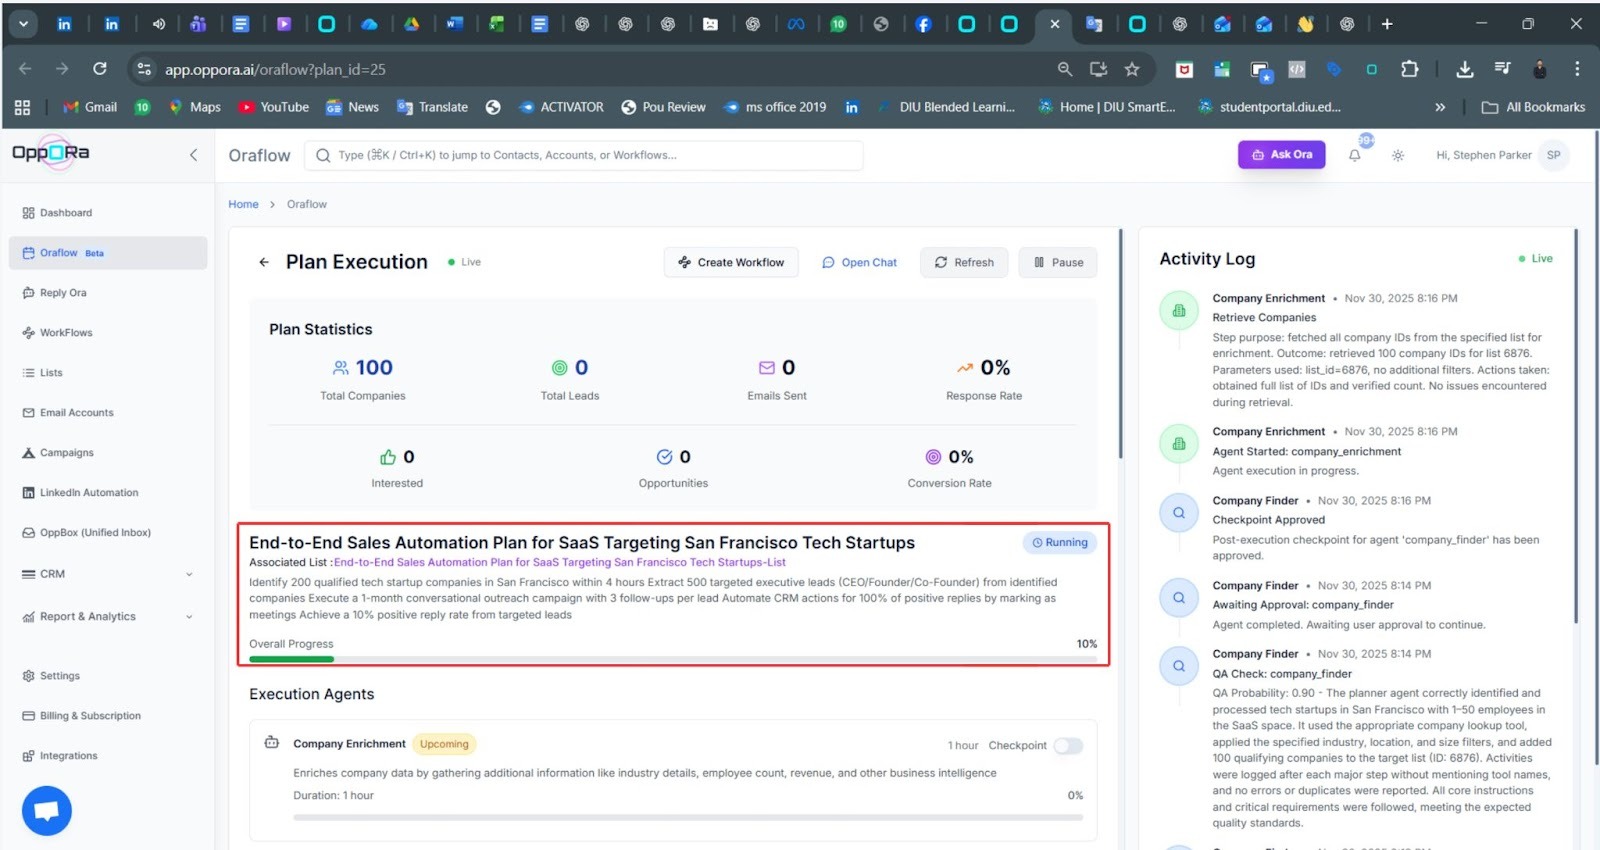
Step 11: Open the Planner
The Planner shows live progress. You’ll see companies found, leads extracted, emails discovered, and agent statuses.
You can also monitor logs to understand what’s happening behind the scenes. This dashboard becomes your control center during execution.
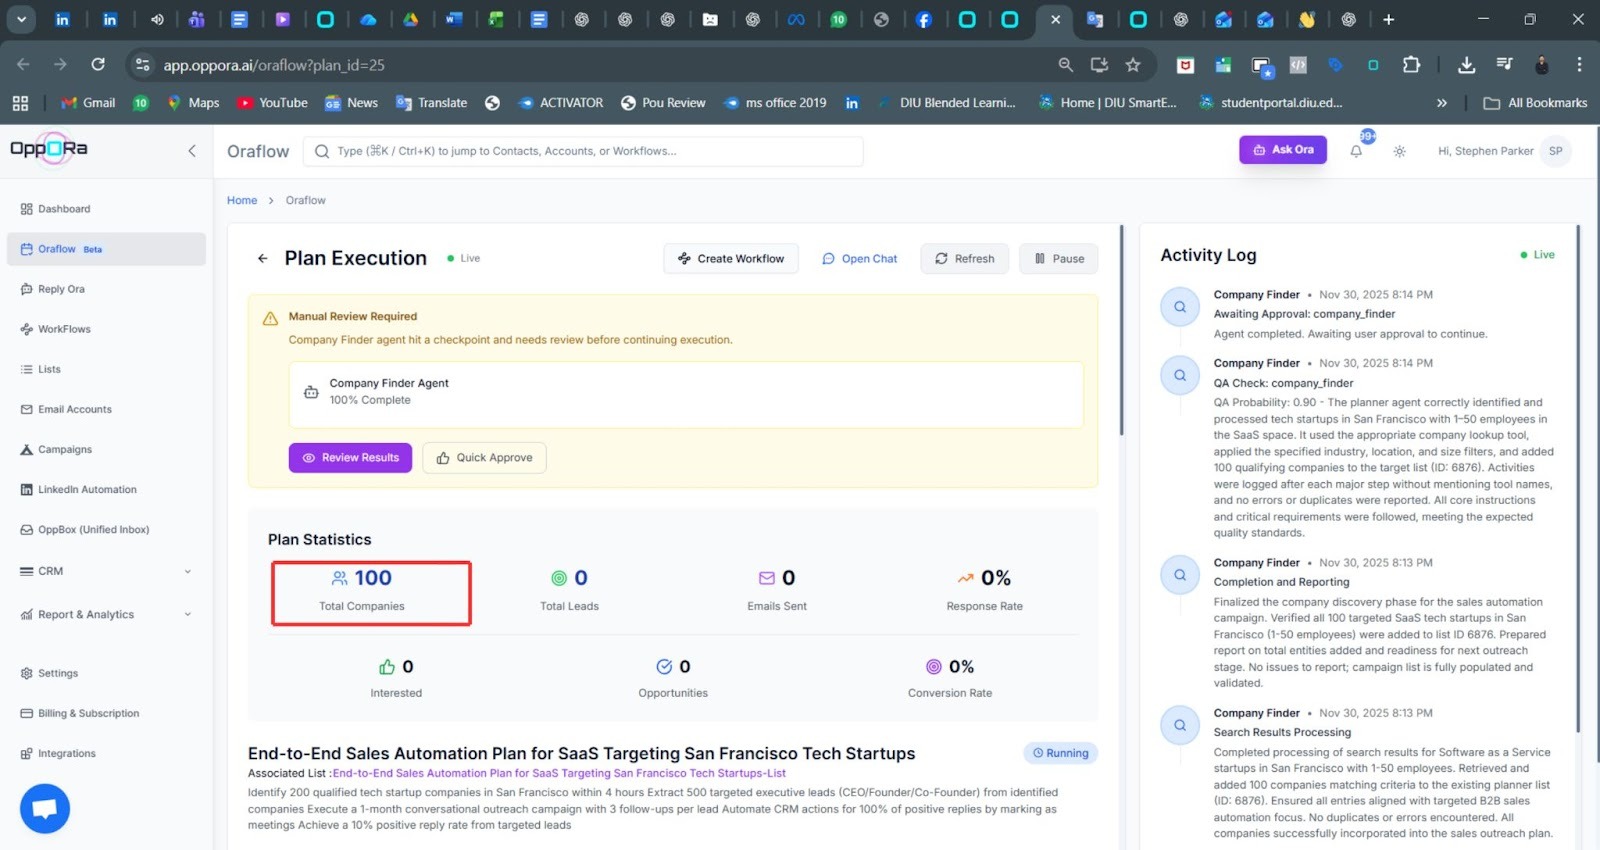
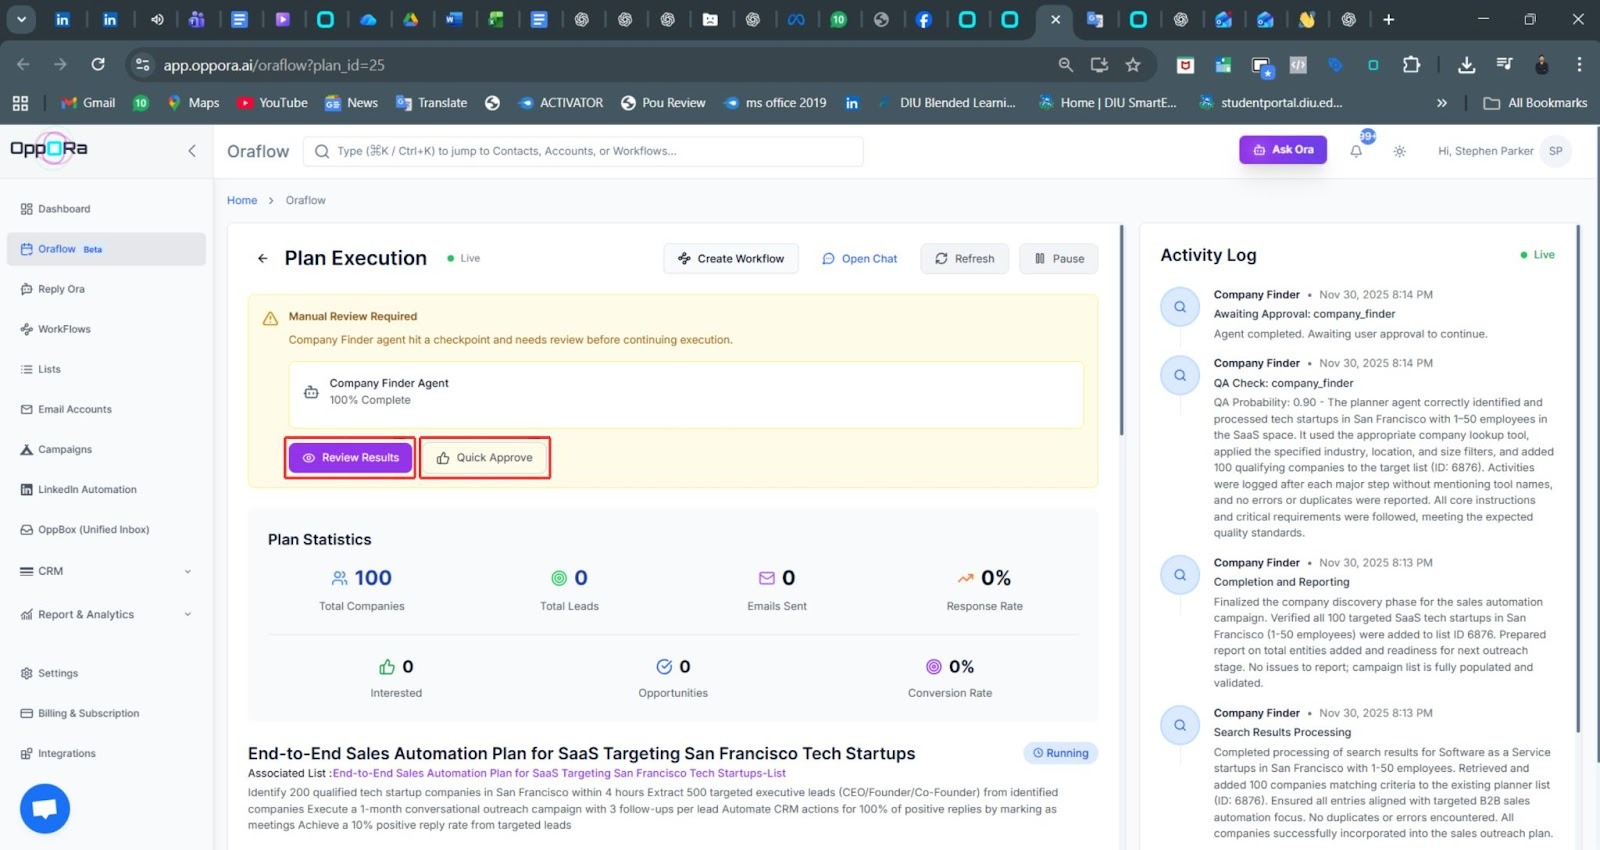
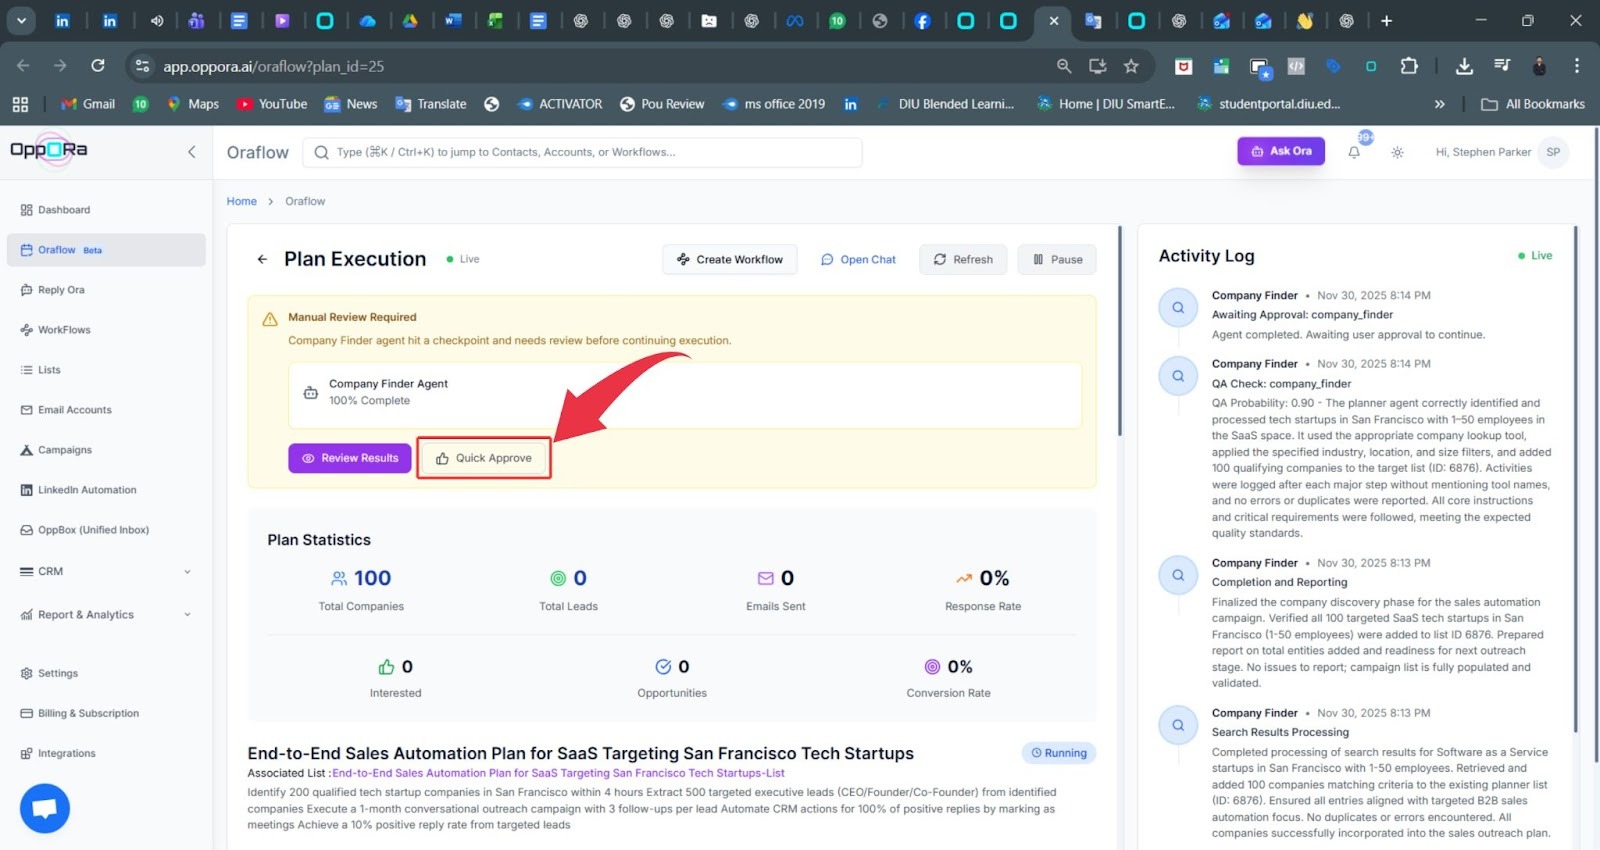
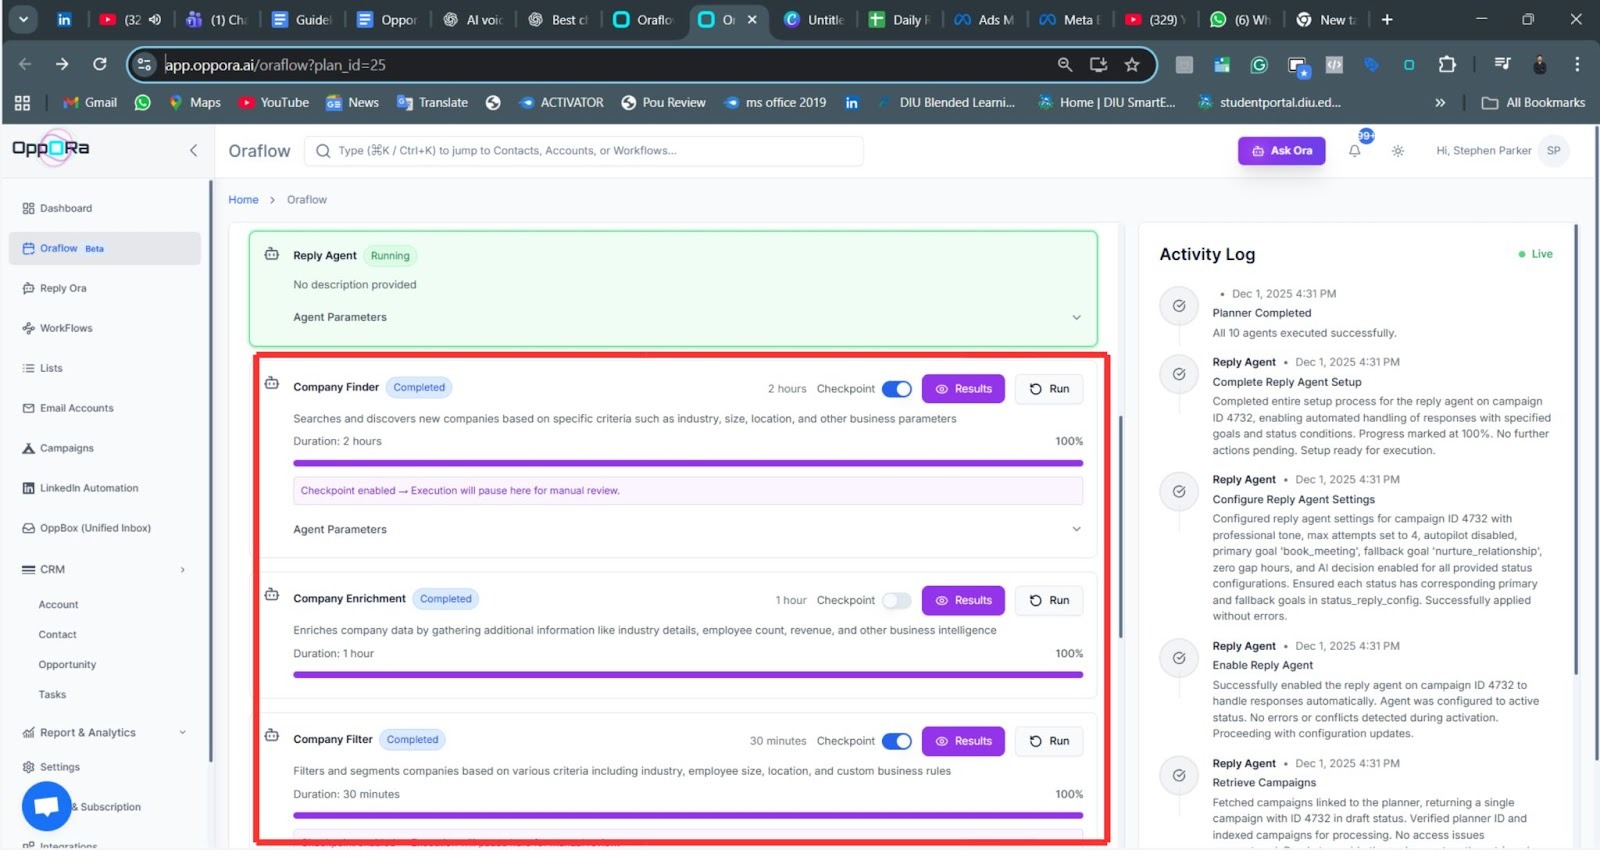
Step 12: Review Checkpoints
Some steps pause for your approval. Checkpoints appear when Oraflow wants you to confirm results, such as company lists or lead data. You can review or quickly approve. This keeps everything accurate without slowing down the system.
Step 13: Inspect Agent Outputs (Optional)
If you choose to review results, you’ll see detailed data like company names, industries, sizes, or extracted leads.
You can remove irrelevant items or request adjustments. This step helps maintain high targeting accuracy.
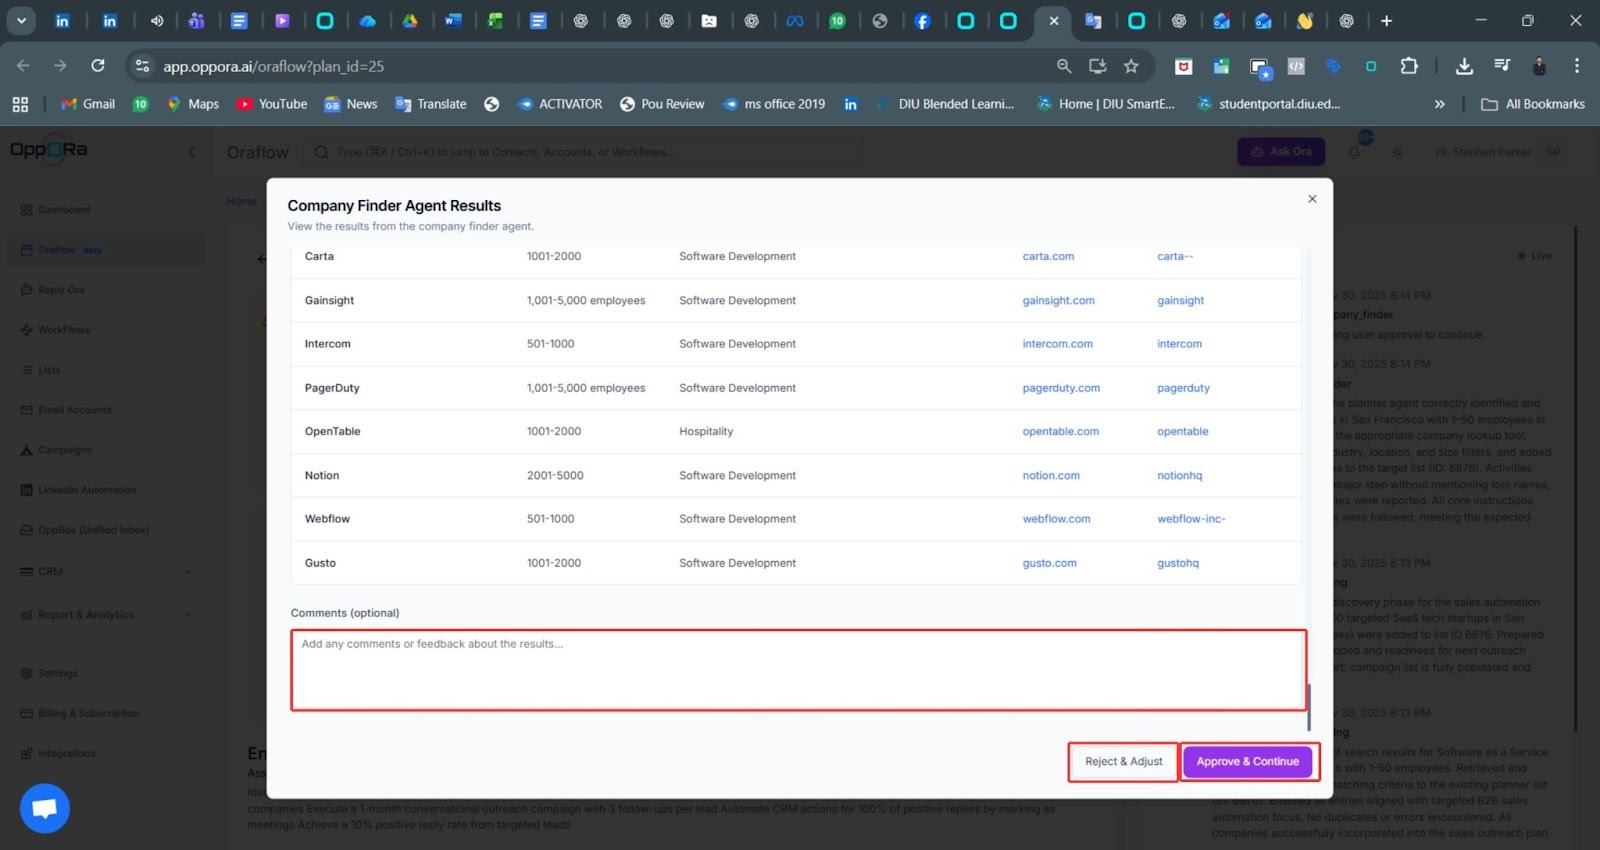
Step 14: Approve Results and Resume Execution
After reviewing, click Approve to continue. Oraflow picks up exactly where it stopped and moves on to the next action. You stay in control, but the system remains fast and automated.
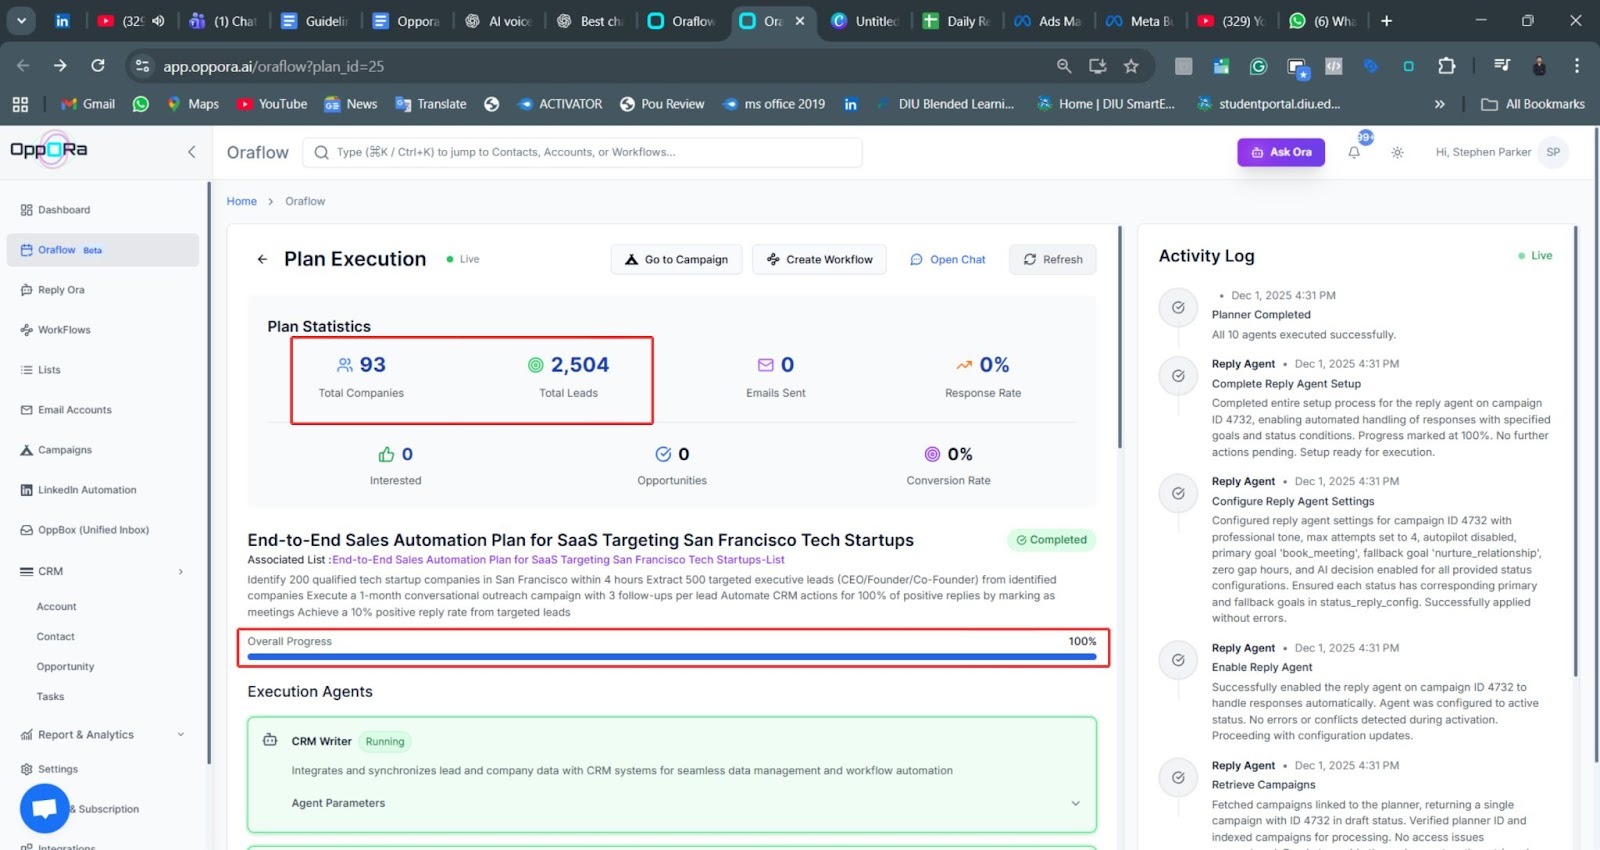
Step 15: Wait for All Agents to Complete
Oraflow completes tasks like company discovery, enrichment, lead extraction, scoring, email finding, and validation.
When everything finishes, you’ll see a 100% completion status. This means your plan is fully built and ready for outreach.

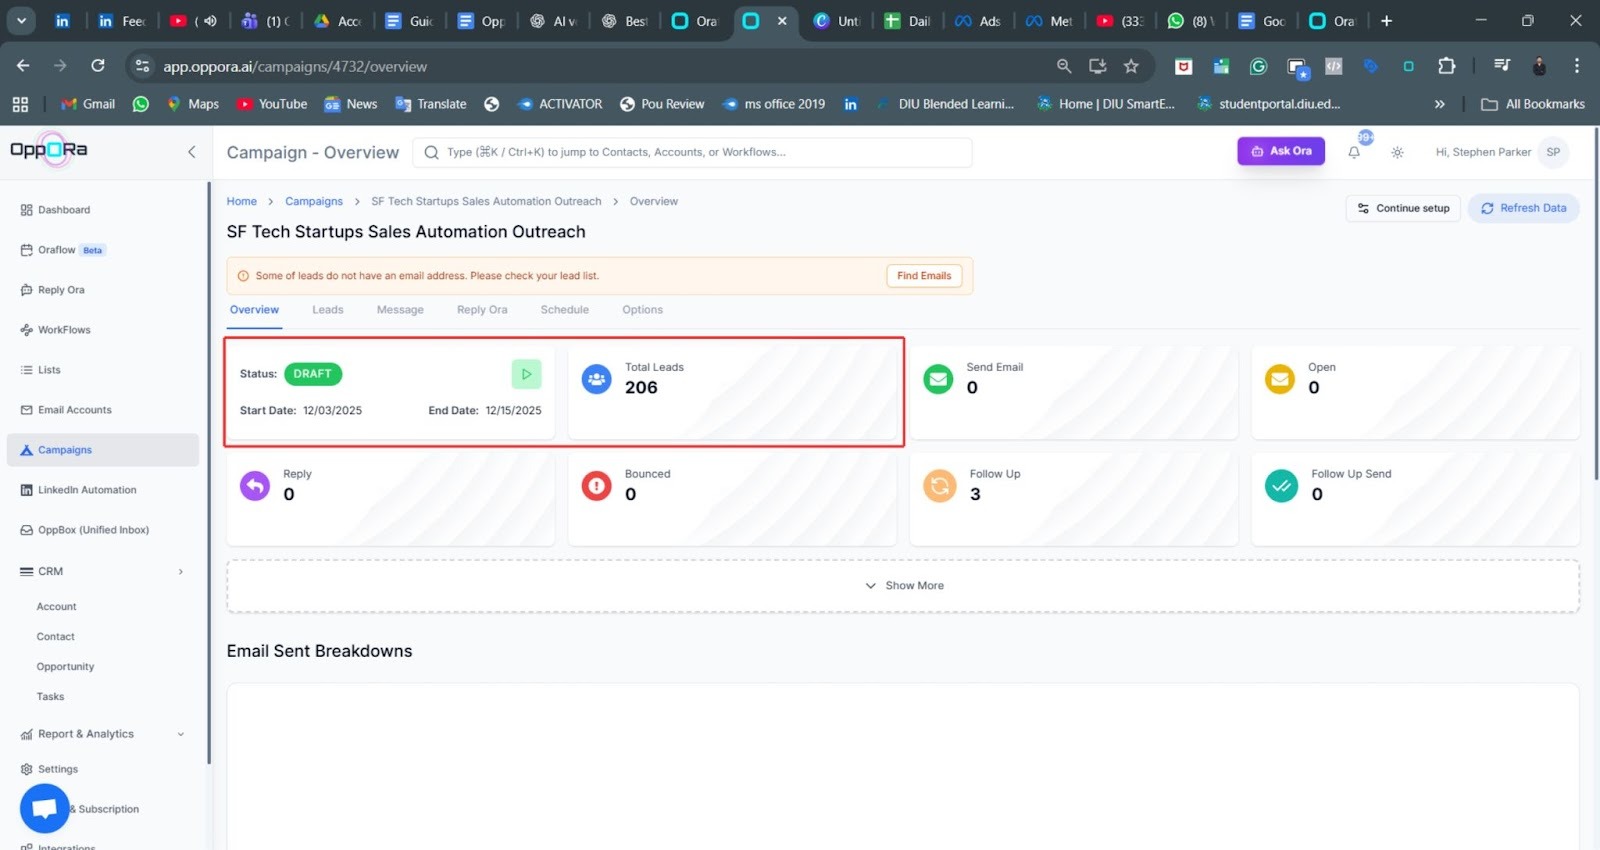
Step 16: Check the Draft Campaign
Oraflow automatically creates a complete campaign. Your leads, email templates, and schedule are already prepared.
You can edit messages or timing before launch. This makes campaign creation nearly instant and effortless.
Creating a Plan Using "New Plan" in Oraflow
In addition to the Oraflow Assistant, you can manually create a plan using the “New Plan” option.
This lets you describe your goal or choose a template, and Oraflow will automatically build a structured plan for your sales outreach.
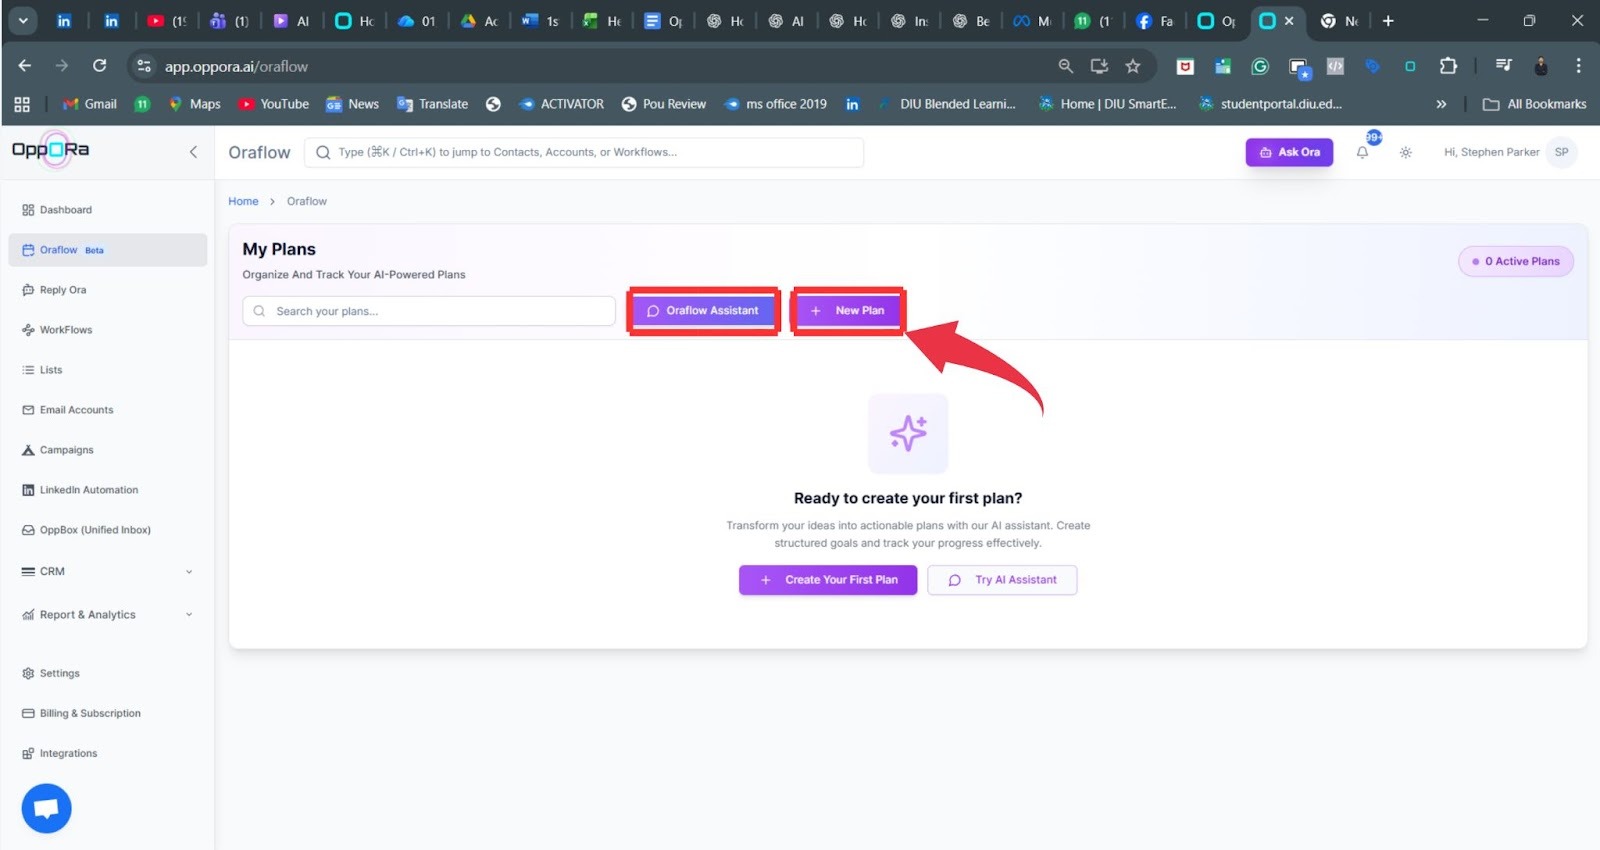
Step 1: Open Oraflow and Click “New Plan”
On the Oraflow dashboard, click New Plan. This will take you to a page where you can set your goal and choose a template. It's the perfect place to create a plan from scratch.
Step 2: Enter Your Goal or Task
In the Objective section, type your goal clearly. For example, “I want to connect with 100 CEOs of startups in San Francisco to promote my new SaaS product for sales automation.”
This helps Oraflow understand your target audience and sales goal. Make sure to provide enough details for better results.
Step 3: Choose a Template
Or If you do not have a clear objective, then you can choose a template that aligns with your sales strategy. Here are your three options:
Regional Expansion: If you’re looking to break into new geographic markets.
Startup Outreach: Best for targeting funded startups in your industry.
Enterprise Sales: For reaching Fortune 500 decision-makers.
Choose the template that fits your goal. Each template pre-defines strategies that are ideal for the respective audience.
Step 4: Generate Your AI Plan
Once you’ve entered your objective and selected a template, click Generate AI Plan. Oraflow will start building your full automation plan, which includes:
Campaign Creation: Generates email templates, schedules, and setup for your outreach campaign.
Email Validation: Checks for valid email addresses to ensure deliverability.
Enrichment: Adds relevant company and lead data to help personalize outreach.
Lead Extraction: Extracts leads within the targeted companies.
Company Discovery: Oraflow identifies companies that fit your goal.
Once the process is complete, you can review and modify messages or timing before launching.
Step 5: Review and Edit Campaign
After generating the plan, Oraflow automatically creates your campaign draft with all the necessary emails, leads, and schedules.
If needed, you can edit email content, adjust sending times, or modify lead lists. This makes your campaign creation quick and effortless.

Launch Campaign + Enable ReplyOra
Start your campaign. As replies arrive, ReplyOra handles responses, books meetings, sends attachments, and updates your CRM automatically. Your workflow is now fully automated from discovery to engagement.
Best Practices
- Write clear goals for better workflows.
- Review checkpoints when accuracy is critical.
- Let ReplyOra handle replies to save time.
- Check the campaign before launching.
- Use the Planner dashboard to monitor progress.
Troubleshooting
- Paused workflow: A checkpoint needs approval.
- Incorrect companies/leads: Adjust targeting and restart planning.
- Missing emails: Use “Find Emails” in the campaign.
- Campaign not starting: Check templates or schedule.
- Reply Ora, inactive: Enable it inside the campaign.
FAQs
- Do I need long prompts? No. One clear sentence works.
- Can I edit the plan later? Yes, before launching automation.
- Does Oraflow validate emails automatically? Yes.
- Will a campaign be generated? Yes, automatically.
- Does ReplyOra work with Oraflow? Absolutely.
Support CTA
If you need help, reach out through in-app chat or visit the Oppora Help Center. We’re here for you anytime.